Tips & Tactics
TIPS & TACTICS
DIGITAL NETS
FLDIGI
FLMSG
FLAMP
MACROS
DIGITAL NETS
FLDIGI
FLDIGI, FLMSG, and FLAMP all feature Drag’n Drop. FLMSG and FLAMP will load a file Drag’n Dropped onto special target squares. FLMSG has a blank blue square, upper right. FLAMP has a White square w/Red ‘DnD’, mid right of page. FLDIGI also features Drag’n Drop but lacks a special target. FLDIGI will load and transmit a file that is Drag’n Dropped into the Transmit pane. This works for many types of file. You can drop FLMSG files directly into FLDIGI. In this case, only text is transmitted, no FLMSG form data.
One caveat to FLDIGI’s Drag’n Drop: Similar to sending images via the Transmit pane, FLDIGI does not return to Receive when finished. You must stop transmission manually. See current FLDIGI Manual for additional Drag’n Drop information.
FLMSG
FLAMP
‘Enable Header Modem‘ is a useful FLAMP option for HF digital Ops. It activates TxID/RxID and sends the file header in a pre-selected mode. This enables you to send the critical Header block in a robust mode, and the remaining blocks in a faster mode. FLAMP switches modes automatically. The Header block contains data FLAMP needs to reassemble the blocks into the original file. The Header, or Preamble, is block# 0 (Zero).
Enabling the next feature, ‘Inhibit Header Modem on Block Fills‘ prevents FLAMP from sending Header fills in the slower mode, chosen in ‘Enable Header Modem’.
FLAMP cannot reassemble and verify files w/o the Preamble. For example, you can send the header in MFSK-32 and the remaining blocks in THOR-50×1 and FLAMP will enable TxID/RxID and switch between modems automatically.
If you don’t enable ‘Inhibit Header Modem on Block Fills’, FLDIGI will switch to the chosen mode when filling block#0. With this feature disabled, all fill blocks will be sent in the mode selected in FLDIGI.
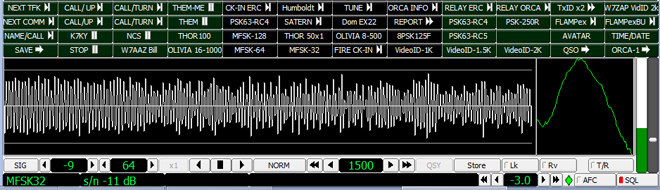
MACROS
Symbols on Macro Buttons reveal Macro function at a glance:
Button Labels: Symbols on Macro Buttons help identify Macro function at a glance. When adding symbols to button labels, leave a space between TEXT and Ampersand. You can make room for more label characters by changing fonts and/or reducing font-size.
Code for FLDIGI Macro Button Symbols:
Rt/arrow, ‘ @>’ = Transmitter START
Pipe, ‘ @|’, = Transmitter STOP
Usage: For macros that START and STOP the transmitter, these symbols indicate macro-function at a glance.
1 rt/arrow & 1 pipe, ‘ @>|’ = turns TX ON, executes instructions, turns TX OFF.
2 rt/arrows, ‘ @>>’ = turns TX ON, executes, and leaves TX ON.
2 pipes, ‘@||’, TX already ON, executes instructions, turns TX OFF.
These symbols are very helpful for macros that precede or follow keyboard entry.
Save Macro files quickly with the <SAVE> Tag:
The <SAVE> Tag enables you to save the current macro file with one click. Saving usually requires opening the File Manager by navigating to ‘File/Macros/Save’, and clicking SAVE’; 4 steps. Add the <SAVE> Tag to any Macro button and name it, ‘SAVE MAC’. Click ‘Apply’ after editing & before leaving the button, then click your ‘SAVE MAC’ button. That’s it; a single click SAVES the file. Put a ‘SAVE MAC’ Button in the same location on every macro set.
The <MACROS> Tag installs another Macro file:
You can switch Macro sets instantly with a single click. It doesn’t matter if FLDIGI is configured for 1, 2, or 4 button rows visible, the next set will present the same. The <MACROS> Tag enables you to switch multiple macro sets instantly. You can develop different sets for different events. Digital nets differ widely in protocol and purpose. Making different files for each net is simple and efficient.
The <MACROS> Tag requires a file system address to locate the file you’re calling. Here’s how to configure for switching files instantly:
Right click any Macro button to open the Macro Editor. In the ‘Select Tag’ list, highlight <MACROS>. Click the Green Arrow to open a File Manager. Navigate to your macro file (.mdf). Click ‘OPEN’, Click ‘APPLY’, then SAVE. You can Save with your ‘SAVE MAC’ (<SAVE> Tag) button if you’ve made one, or via File/Macros/Save.
We use two full Macro sets to run ORCA and switch between them seamlessly. Configure each of your macro sets to call the others. I have 4 sets, 2 for ORCA, 1 for other Nets, and one for QSOs and macro development. Each set has buttons for the other sets. If you use many macros, you’ll appreciate the <SAVE> Tag.
As your Macro skills develop, you’ll be using more Macros. It’s handy to see all 4 button rows at once. By default, FLDIGI only presents rows 1 & 2; to use the other two rows, you must click row 2’s button to see row 3, and click the row 3 button to see row 4. You can also configure FLDIGI to make all 4 rows visible at once Here’s how:
1) In the FLDIGI Top Bar ‘View’ Menu, Enable ‘View/Hide 48 macros’. This will locate 4 macro bars above the RX window.
2) To place 4 macro bars below the TX window, go to ‘Configure/UI/Macro buttons’, and Enable ‘4 bar macro set below TX’.
Execute macros instantly with Function Keys:
Keyboard Function Keys, the keys at the top of the kbd numbered F1-F12, are linked to the 12 macros in Row#1. The first twelve macros execute instantly by tapping their Function Key. Frequently used macro should be placed in Row#1. If you use more than one set of macros, put the same macro in the same position on every set.
FLDIGI Manual 4.1.20, Ch53.1, pp455.
Five years ago, our FIDIGI benefactor, Dave W1HKJ, added the ‘All four rows visible at once’ feature for ORCA DIGITAL NET.
Remember: Macro execution can be terminated instantly by tapping ESC. This also clears TX buffer.
In a digital net Comment Round, you may wish to comment on previous comments, but forget the thread when your turn comes. You can record Comments as the net unfolds and send them w/one Click with this Macro.
1) In a Text Editor, create the file, ‘comments.txt’ on the Desktop or your preferred location for text files.
2) Open the Macro Editor by right clicking any button.
3) Place Cursor at the beginning of line 1.
4) Highlight <FILE> in the Tag Menu and Click the Green Arrow. Navigate to your new file, ‘comments.txt’ and Click OPEN. The Editor enters the Tag & Argument(file-name/address).
5) Directly after the Tag, add ‘ < <MYCALL><TX><RX>’. Example: <FILE:E:\FL_APPS\Data\0RCAannounce.txt> < <MYCALL><TX><RX>.
6) In the Button Label window, enter: ‘Comment @>|’.
7) Click APPLY and Save your Macro.
Have’comments.txt’ Open on your desktop during nets and enter comments as the net evolves. When called for Comments, simply click your ‘Comments’ Macro. Remember to SAVE after every Edit so your transmission will be current. Next net, Delete old text and start anew. You don’t need to end your comments with your CALLSIGN. It’s in the macro.


